Quite often, I receive questions from plugin users asking me why they are having problems with the way that their plugins appear. Almost always, their requests for support begin with “I found a problem with your plugin…” or “There’s a bug in [name of plugin] …”
I would like to provide some background information that may be helpful regarding why this kind of thing happens and how you can quite easily (in most cases) resolve issues of this type.
Why do some WordPress plugins cause my website to look messed up?
Thank you for asking! In order to answer this question properly, I really need to explain the difference between WordPress plugins and WordPress themes.
WordPress plugins provide functionality. The functionality that plugins provide can be anything from an API interface for your Facebook page or a system that allows you to manage prayer requests on your website (like PrayBox+).
WordPress themes provide interface components. Interface components are usually associated with colors, images, backgrounds, layout elements, and graphics of that nature that have to do with your overall website look and feel.
The descriptions of plugins and themes above is rather simplistic, and, in the purest sense, may be true; however, it’s almost impossible to find a plugin that doesn’t in some way HAVE to provide graphic elements such as CSS for layout of some of the functionality that it provides or a theme that doesn’t implement functionality in some way, shape, form, or fashion. As a result of the fact that some of these lines cross, occasionally, it’s quite possible that some aspects of your theme, for instance, may require a little tweaking when it comes to the way that your plugin appears within the context of your theme.
How do we tweak our themes in order to accommodate our plugins?
Once again, thank you for asking! It’s really quite easy, in most cases, to tweak your theme’s main CSS file in order to adjust the plugin’s appearance. Although I’m not going to get into it at this point, it’s a good idea to understand CSS specificity, as it can be quite helpful when it comes to making tweaks of this sort. Basically, you want to find out which attributes in the plugin’s CSS file are causing the plugin to conflict with your theme and override them.
Here’s how we do it… as an example, I’ll use a website that was experiencing this problem with my Prayer Request Management plugin, PrayBox. As you can see in the image below, the theme being used on the website has a dark image in the background, and therefore, white text. Since this is a bit atypical, I designed the PrayBox plugin to display prayer requests with a light background, and you can see the results of the conflict when used in the context of this particular theme.

As we begin, you need to get something like Firebug (if you’re using Firefox) or some other tool (or, if you’re an HTML ninja, looking at the source code of your blog, although this will take much longer) that allows you to identify the CSS attributes that are causing the conflict.
Second, use Firebug (or whatever tool you have chosen) to select the component that needs to be overridden. You’ll see something similar to the image below when you highlight the element causing the conflict:
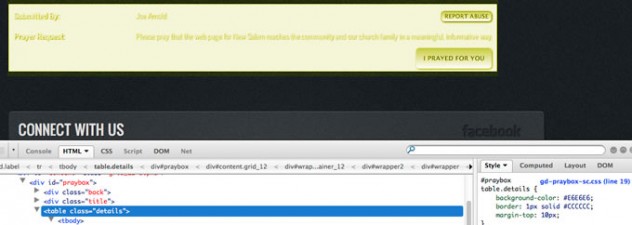
As you can see in the bottom panel, we’ve identified the attributes of the table with the class “details” in the div with the id “praybox” as causing the conflict, because (as you can see on the right side of the bottom panel) the background-color attribute is defined as “#E6E6E6”.
So what we must do is override the style for “#praybox table.details” … we do this by finding our theme’s main stylesheet (it’s usually called “style.css” and is located in your theme’s folder which is located in “/wp-content/themes/”).
Once you have located the “style.css” file in your theme’s folder, go down to the very bottom of that file and insert something like this:
/* Custom PrayBox Styles */
This will basically help you find the custom styles that we are about to define if we need to in the future.
Immediately below this line, go ahead and type the identifier of the element that we want to modify. In this case, our custom styles area is going to look something like this:
#praybox table.details { }
In between the squiggly brackets, we define the attribute for the element with whatever we want to use instead and make sure we use “!important” after the attribute definition… like this:
#praybox table.details { background-color: #000 !important; }
Once you’ve done this and have saved your “style.css” file, you should be able to reload the page and see your changes… you may actually have to refresh or clear cache or something, as CSS information is often kept in your browser’s cache…
Oh yeah, and you may want to make sure that you’ve temporarily disabled any plugins that you may have installed on your WordPress site that cache page content… because as long as those caching plugins are active, you’re not going to see the results of any changes to your stylesheet.
One More Thing… Why Not Make Changes to the Plugin’s CSS File?
Yet another wonderful question… you are a very sharp student! Very simply, the reason why we don’t want to make changes to the plugin’s CSS file is twofold:
- The changes that you’re making are only really relevant when the plugin is being used with that theme. If you install another theme, you would likely want to define different attributes for the plugin.
- Whenever you update a plugin, it’s very likely that the CSS file for that theme will be overwritten… and then, you’ve gotta go back in and make the changes all over again.
I hope that this post has been helpful and will be useful for you in the future. By mastering the skills associated with customizing styles for WordPress plugins, you can actually do some really amazing things.